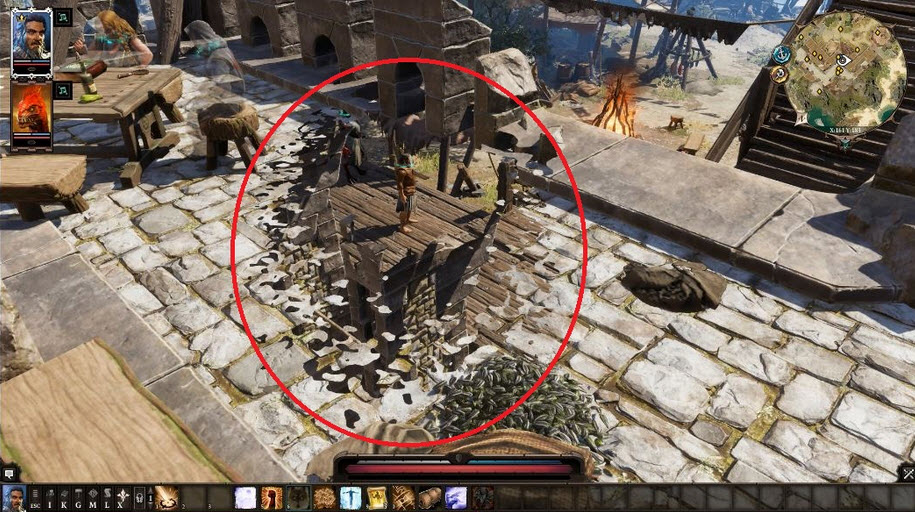
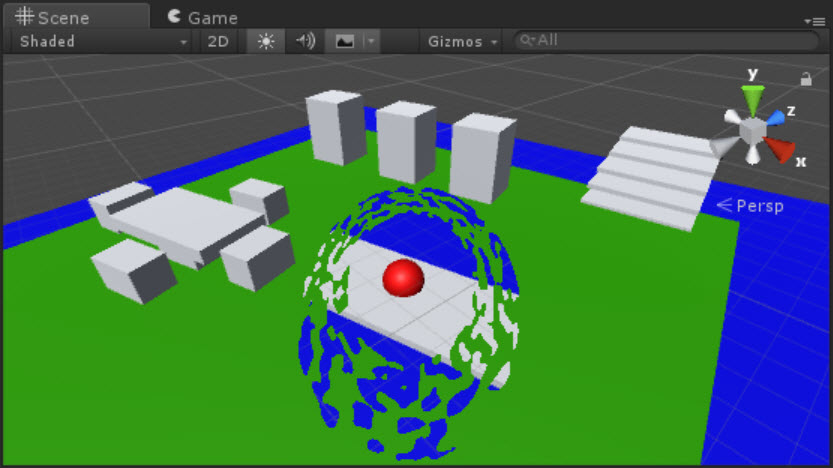
마스킹
이 효과를 얻으려면 스텐실 버퍼를 사용하여 객체를 마스크 할 수 있습니다.
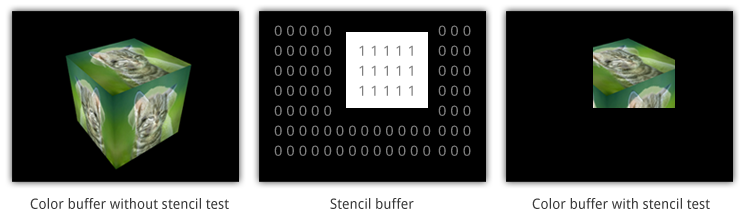
스텐실 버퍼는 화면에 그려진 각 픽셀에 대해 추가 8 비트 정수 (예 : 0-255의 값)를 저장할 수있는 범용 버퍼입니다. 셰이더가 RGB 값을 계산하여 화면의 픽셀 색상을 결정하고 깊이 버퍼에 그려진 픽셀의 깊이에 대한 z 값을 지정하는 것처럼 각 픽셀에 대한 임의의 값을 스텐실 버퍼에 쓸 수도 있습니다. 그런 다음 이러한 스텐실 값을 쿼리하고 후속 셰이더 패스와 비교하여 픽셀을 화면에서 합성하는 방법을 결정할 수 있습니다.
https://docs.unity3d.com/Manual/SL-Stencil.html
https://alastaira.wordpress.com/2014/12/27/using-the-stencil-buffer-in-unity-free/
http://www.codingwithunity.com/2016/01/stencil-buffer-shader-for-special.html
마스크 스텐실 :
Stencil
{
    Ref 1 // ReferenceValue = 1
    Comp NotEqual // Only render pixels whose reference value differs from the value in the buffer.
}
벽 스텐실 :
Stencil
{
    Ref 1 // ReferenceValue = 1
    Comp Always // Comparison Function - Make the stencil test always pass.
    Pass Replace // Write the reference value into the buffer.
}
구현하자.
이것을 마스크로 사용하십시오 :
Shader "Custom/SimpleMask"
{
    Properties
    {
        _MainTex ("Texture", 2D) = "white" {}
        _CutOff("CutOff", Range(0,1)) = 0
    }
    SubShader
    {
        LOD 100
        Blend One OneMinusSrcAlpha
        Tags { "Queue" = "Geometry-1" }  // Write to the stencil buffer before drawing any geometry to the screen
        ColorMask 0 // Don't write to any colour channels
        ZWrite Off // Don't write to the Depth buffer
        // Write the value 1 to the stencil buffer
        Stencil
        {
            Ref 1
            Comp Always
            Pass Replace
        }

        Pass
        {
            CGPROGRAM
            #pragma vertex vert
            #pragma fragment frag

            #include "UnityCG.cginc"

            struct appdata
            {
                float4 vertex : POSITION;
                float2 uv : TEXCOORD0;
            };

            struct v2f
            {
                float2 uv : TEXCOORD0;
                float4 vertex : SV_POSITION;
            };

            sampler2D _MainTex;
            float4 _MainTex_ST;
            float _CutOff;

            v2f vert (appdata v)
            {
                v2f o;
                o.vertex = UnityObjectToClipPos(v.vertex);

                o.uv = TRANSFORM_TEX(v.uv, _MainTex);

                return o;
            }

            fixed4 frag (v2f i) : SV_Target
            {
                fixed4 col = tex2D(_MainTex, i.uv);
                float dissolve = step(col, _CutOff);
                clip(_CutOff-dissolve);
                return float4(1,1,1,1)*dissolve;
            }
            ENDCG
        }
    }
}
이것을 벽으로 사용하십시오 :
Shader "Custom/Wall" {
    Properties {
        _Color ("Color", Color) = (1,1,1,1)
        _MainTex ("Albedo (RGB)", 2D) = "white" {}
        _Glossiness ("Smoothness", Range(0,1)) = 0.5
        _Metallic ("Metallic", Range(0,1)) = 0.0
    }
    SubShader {
        Blend SrcAlpha OneMinusSrcAlpha
        Tags { "RenderType"="Opaque" }
        LOD 200

        Stencil {
            Ref 1
            Comp NotEqual
        }

        CGPROGRAM
        // Physically based Standard lighting model, and enable shadows on all light types
        #pragma surface surf Standard fullforwardshadows

        // Use shader model 3.0 target, to get nicer looking lighting
        #pragma target 3.0

        sampler2D _MainTex;

        struct Input {
            float2 uv_MainTex;
        };

        half _Glossiness;
        half _Metallic;
        fixed4 _Color;

        void surf (Input IN, inout SurfaceOutputStandard o) {
            // Albedo comes from a texture tinted by color
            fixed4 c = tex2D (_MainTex, IN.uv_MainTex) * _Color;
            o.Albedo = c.rgb;
            // Metallic and smoothness come from slider variables
            o.Metallic = _Metallic;
            o.Smoothness = _Glossiness;
            o.Alpha = c.a;
        }
        ENDCG
    }
    FallBack "Diffuse"
}
효과 분석
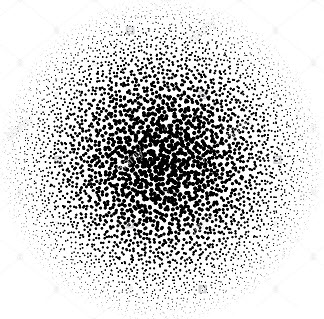
절차 적 텍스처 를 원한다면 약간의 노이즈가 필요합니다.
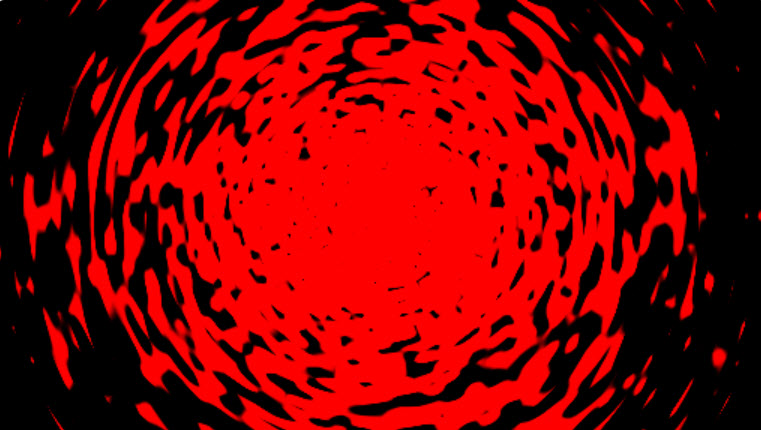 이 쉐이더는 ShaderToy 에서 볼 수 있습니다 .
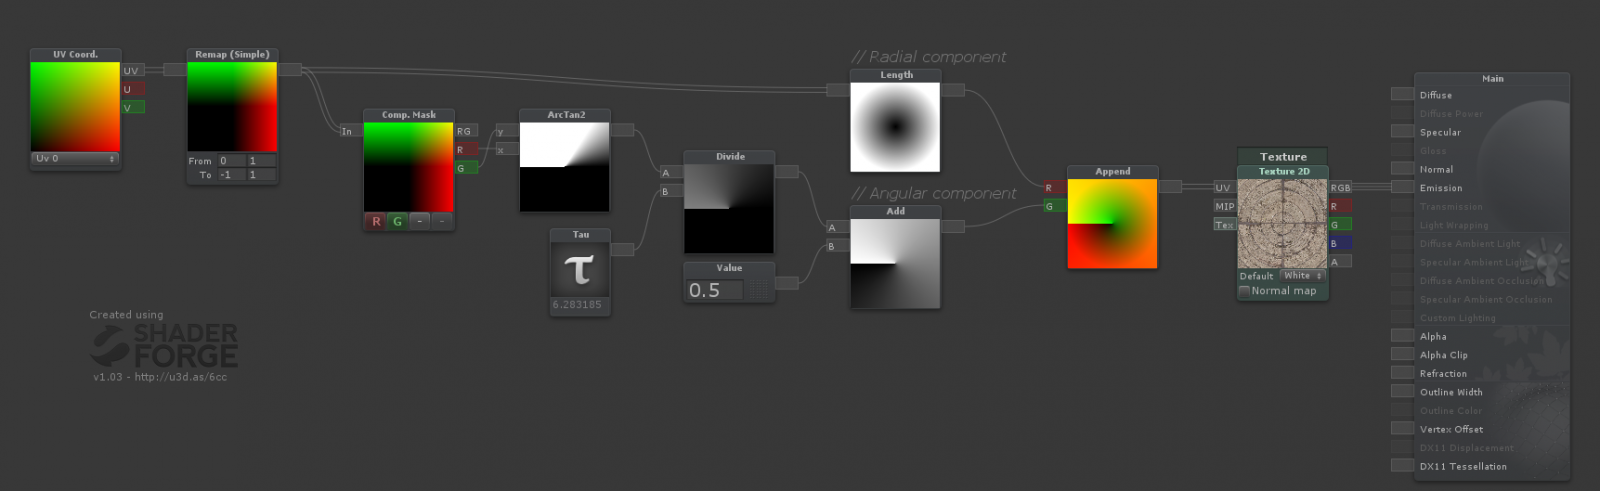
이 효과를 만들려면 UV 좌표를 사용하는 대신 극좌표를 사용 하여 노이즈 텍스처로 설정하십시오.
Uvs는 일반적으로 픽셀 na 화면 (X = 너비, Y = 높이)과 같은 형식으로 그리드에 배치됩니다. 그러나 극좌표는 x와 ya 비트를 다르게 사용합니다. 하나는 원의 중심에서 얼마나 떨어져 있는지를 결정하고 다른 하나는 필요한 것에 따라 0-1 범위에서 각도를 결정합니다.
Shader "Smkgames/NoisyMask" {
    Properties {
        _MainTex ("MainTex", 2D) = "white" {}
        _Thickness ("Thickness", Range(0, 1)) = 0.25
        _NoiseRadius ("Noise Radius", Range(0, 1)) = 1
        _CircleRadius("Circle Radius", Range(0, 1)) = 0.5
        _Speed("Speed", Float) = 0.5
    }
    SubShader {
        Tags {"Queue"="Transparent" "IgnoreProjector"="true" "RenderType"="Transparent"}
        ZWrite Off
        Blend SrcAlpha OneMinusSrcAlpha
        Cull Off

        Pass {
            CGPROGRAM
            #pragma vertex vert
            #pragma fragment frag
            #include "UnityCG.cginc"
            #pragma target 3.0
            uniform sampler2D _MainTex; uniform float4 _MainTex_ST;
            uniform float _Thickness,_NoiseRadius,_CircleRadius,_Speed;

            struct VertexInput {
                float4 vertex : POSITION;
                float2 texcoord0 : TEXCOORD0;
            };
            struct VertexOutput {
                float4 pos : SV_POSITION;
                float2 uv0 : TEXCOORD0;
                float4 posWorld : TEXCOORD1;

            };
            VertexOutput vert (VertexInput v) {
                VertexOutput o = (VertexOutput)0;
                o.uv0 = v.texcoord0;

                o.pos = UnityObjectToClipPos(v.vertex);
                o.posWorld = mul(unity_ObjectToWorld, v.vertex);
                return o;
            }
            float4 frag(VertexOutput i, float facing : VFACE) : COLOR {

                float2 uv = (i.uv0*2.0+-1.0); // Remapping uv from [0,1] to [-1,1]
                float circleMask = step(length(uv),_NoiseRadius); // Making circle by LENGTH of the vector from the pixel to the center
                float circleMiddle = step(length(uv),_CircleRadius); // Making circle by LENGTH of the vector from the pixel to the center
                float2 polaruv = float2(length(uv),((atan2(uv.g,uv.r)/6.283185)+0.5)); // Making Polar
                polaruv += _Time.y*_Speed/10;
                float4 _MainTex_var = tex2D(_MainTex,TRANSFORM_TEX(polaruv, _MainTex)); // BackGround Noise
                float Noise = (circleMask*step(_MainTex_var.r,_Thickness)); // Masking Background Noise
                float3 finalColor = float3(Noise,Noise,Noise);
                return fixed4(finalColor+circleMiddle,(finalColor+circleMiddle).r);
            }
            ENDCG
        }
    }
    FallBack "Diffuse"
}
다른 해결책은 worley noise를 사용하는 것입니다.
이 쉐이더를 ShaderToy 에서 볼 수 있습니다
메타 볼
그런 다음 이 기사 에서 metaball 효과를 추가 하십시오 .

빌 탑승
더있다 ...
당신이 당신의 카메라에보고, 마스크를 회전하려면 사용할 수 있습니다 빌 보드 :
 output.pos = mul(UNITY_MATRIX_P,
              mul(UNITY_MATRIX_MV, float4(0.0, 0.0, 0.0, 1.0))
              + float4(input.vertex.x, input.vertex.y, 0.0, 0.0));
이것은 빌 탑승과 마스크입니다 :
Shader "Custom/Mask/SimpleMaskBillBoard"
{
    Properties
    {
        _MainTex ("Texture", 2D) = "white" {}
        _CutOff("CutOff", Range(0,1)) = 0
        _Radius("Radius", Range(0,1)) = 0.2
        _Speed("speed", Float) = 1
        _ScaleX ("Scale X", Float) = 1.0
        _ScaleY ("Scale Y", Float) = 1.0
    }
    SubShader
    {
        LOD 100
        Blend One OneMinusSrcAlpha
        Tags { "Queue" = "Geometry-1" }  // Write to the stencil buffer before drawing any geometry to the screen
        ColorMask 0 // Don't write to any colour channels
        ZWrite Off // Don't write to the Depth buffer

        // Write the value 1 to the stencil buffer
        Stencil
        {
            Ref 1
            Comp Always
            Pass Replace
        }

        Pass
        {
            CGPROGRAM
            #pragma vertex vert
            #pragma fragment frag

            #include "UnityCG.cginc"

            struct appdata
            {
                float4 vertex : POSITION;
                float2 uv : TEXCOORD0;
            };

            struct v2f
            {
                float2 uv : TEXCOORD0;
                float4 vertex : SV_POSITION;
            };

            sampler2D _MainTex;
            float4 _MainTex_ST;
            float _CutOff;
            float _Speed;
            float _Radius;
            float _ScaleX,_ScaleY;

            v2f vert (appdata v)
            {
                v2f o;
                o.vertex = mul(UNITY_MATRIX_P,
                    mul(UNITY_MATRIX_MV, float4(0.0, 0.0, 0.0, 1.0))
                    + float4(v.vertex.x, v.vertex.y, 0.0, 0.0)
                    * float4(_ScaleX, _ScaleY, 1.0, 1.0));

                o.uv = TRANSFORM_TEX(v.uv, _MainTex);
                return o;
            }

            fixed4 frag (v2f i) : SV_Target
            {
                fixed4 col = tex2D(_MainTex, i.uv);
                float dissolve = step(col, _CutOff);
                clip(_CutOff-dissolve);
                return dissolve;
            }
            ENDCG
        }
    }
}
최종 결과:
출처는 다음과 같습니다 : https://github.com/smkplus/Divinity-Origin-Sin-2
유용한 링크
나는 세상을 해산함으로써이 효과를 구현 한 좋은 튜토리얼을 발견했다.
세상을 녹이기 1 부
세상을 녹이기 2 부
Shader "Custom/DissolveBasedOnViewDistance" {
    Properties{
        _MainTex("Albedo (RGB)", 2D) = "white" {}
        _Center("Dissolve Center", Vector) = (0,0,0,0)
        _Interpolation("Dissolve Interpolation", Range(0,5)) = 0.8
        _DissTexture("Dissolve Texture", 2D) = "white" {}
    }

        SubShader{
        Tags { "RenderType" = "Opaque" }
        LOD 200


            CGPROGRAM

        #pragma surface surf Standard vertex:vert addshadow

        #pragma target 3.0

        struct Input {
            float2 uv_MainTex;
            float2 uv_DissTexture;
            float3 worldPos;
            float viewDist;
        };


        sampler2D _MainTex;
        sampler2D _DissTexture;
        half _Interpolation;
        float4 _Center;


        // Computes world space view direction
        // inline float3 WorldSpaceViewDir( in float4 v )
        // {
        //     return _WorldSpaceCameraPos.xyz - mul(_Object2World, v).xyz;
        // }


        void vert(inout appdata_full v,out Input o){
            UNITY_INITIALIZE_OUTPUT(Input,o);

         half3 viewDirW = WorldSpaceViewDir(v.vertex);
         o.viewDist = length(viewDirW);

        }

        void surf(Input IN, inout SurfaceOutputStandard o) {


            float l = length(_Center - IN.worldPos.xyz);

            clip(saturate(IN.viewDist - l + (tex2D(_DissTexture, IN.uv_DissTexture) * _Interpolation * saturate(IN.viewDist))) - 0.5);

         o.Albedo = tex2D(_MainTex,IN.uv_MainTex);
        }
        ENDCG
        }
        Fallback "Diffuse"
}
다른 스텐실 튜토리얼 :
스텐실 튜토리얼